

DIY Valentine’s Day Heart Box Craft
Valentine’s Day is just over a month away. Everyone appreciates being thought of. Not many things make a person feel more special then receiving something made especially for them. Instead of spending money on a gift box, you can make your own with items you probably already have around the house. This corrugated Valentine’s Day heart box can be personalized and even be resized if you need to. The materials are easy to find and are very affordable. So if you are ready to be crafty, then let us begin making this lovely heart box now!
Some of the posts on this site, like this one, contain an affiliate link. This means I MAY get paid a SMALL (and I do mean small) commission IF you purchase the product or service.
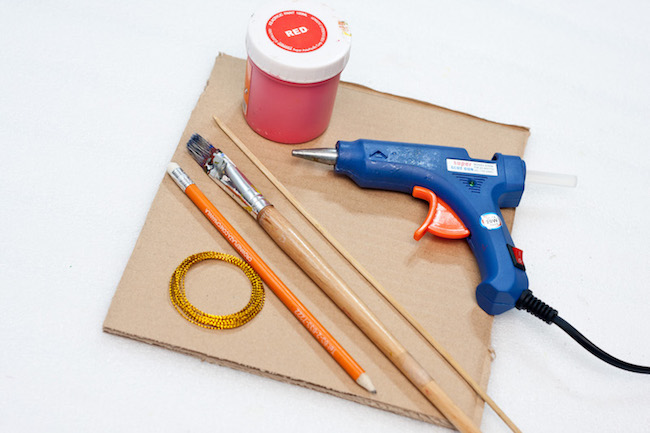
These are the materials you will need for this craft.
- 1 piece of thick-layered cardboard
- 1 piece of brown construction board
- red acrylic paint
- paint brush
- cutter
- metallic gold thread
- lead pencil
- wooden skewer
- hot glue gun and glue sticks

Step 1. Cut two squares on a piece of cardboard. Draw two hearts using a lead pencil in each of the square cardboard. One heart should be bigger since the other heart will be the top cover and the other one is the bottom part of the box.
Step 2. Carefully cut the hearts using a sharp cutter.

Step 3. Corrugate the bigger heart using a piece of wooden skewer. Insert the tip of the skewer on the openings of the side carton then slowly pull the skewer up. Make sure that you are inserting the skewer on an alternate fashion to ensure that you are removing one side of the cardboard only.
Step 4. Cut a strip of cardboard that is about 2 centimeters wide. The length should be around a foot long.
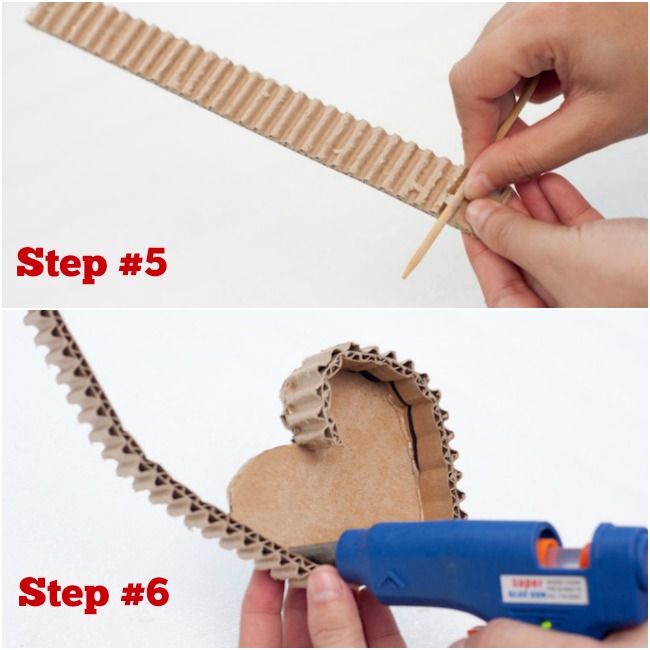
Step 5. Corrugate the strip of board using the same procedure used in the hearts.
Step 6. Use the glue gun to glue the corrugated strip to the bigger heart’s edges. Make sure to start at the sides of the heart for better results.

Step 7. Let it dry for an hour. It should look like this when done. This will be the cover of the heart box.
Step 8. Cut a strip of brown construction board. The width should be at least 3 to 4 centimeters and the length should be at least a foot long. Glue this brown board strip on the edges of the smaller heart.

Step 9. Try to fit the cover to the bottom part of the heart box. Make the necessary adjustments, if possible.
Step 10. Paint the corrugated cover of the heart box with red acrylic paint. Let it dry for an hour or two.

Step 11. You can now place your gift inside the heart box and place the cover of the box after this.
Step 12. Tie the box using metallic gold twine or thread and create a bow.
Your heart box is now finished! You can now give your Valentine’s Day gift to your loved one using this corrugated heart box!
This heart shaped box is perfect for Valentine’s Day. You can change the dimensions of this based on your needs and you can even put some décor on it to fit your sense of style. It’s a fun alternative to the gift boxes you commonly see in the stores. Hope you loved it!

Cute and crafty.
How fun and festive! I love crafts that recycle old products. Someone’s trash is another man’s treasure! 🙂
This is so stinkin cute! I love repurposing things and this DIY came out great and perfect for gift giving!
I wish I was crafty instead of all thumbs! This really is a great way to box a Valentine’s gift–and it is so pretty!
This is a cute craft! I think Valentines crafts are my fav because they just come from so much love!
Wow! This is really cute and unique idea! I’m a fan of crafts, recycling a thing is really helpful too
These are so precious! I love these! They look like a fun DIY for Valentine’s Day! I think we have some boxes laying around I can use!
This is such a cute Valentine’s Day craft. I think it is so easy to make and makes for such a sweet personalized gift to give a loved one.
These look so cute! My kids would love to try to make these!
This is so cute! My kids are going to love trying it out!
It’s a lot more delicate work than imagined but, the finished crafty box is beautiful.
very creative… and very nice, thanks for sharing.,